


Installing New Fan and Fan Belt
- Oct 30, 2015
Quick Tips: Installing New Fan and Fan Belt in Your Corvette
Time: 1 hour
Tools: standard socket set, standard wrenches, long screwdriver or pry bar
Cost: approximately $40-$70
Tinware: replacement or aftermarket engine fan, aftermarket fan spacer (if needed), fan belt
Tip: Always be careful of loose clothing, jewelry, or hair when working around engine fans. Keep an eye out for any wiring or tools as well.
Performance gains: increased airflow and cooling capacity, horsepower gains from lack of drag on the motor at high RPM
Although many complain of the power loss and drag created by engine fans, they are highly necessary in just about every application. Some enthusiasts swear by the rigid, fixed-blade stock fans. Some prefer thermal and non-thermal clutch-type fans. And others exclusively use high-speed flex fans for their cooling needs. Needless to say, the possibilities are endless. It’s just a matter of finding the right combination of components that will complement your engine and meet its cooling requirements. And that can be the tricky part…
Before running down to your local parts store and buying whatever is hanging on the wall, spend a little time researching different fans and their characteristics. Call the technical support hotlines of the manufacturers. Tell them what you have and what you are looking for. The more information you obtain on the subject, the better equipped you will be to make the right selection for your motor.
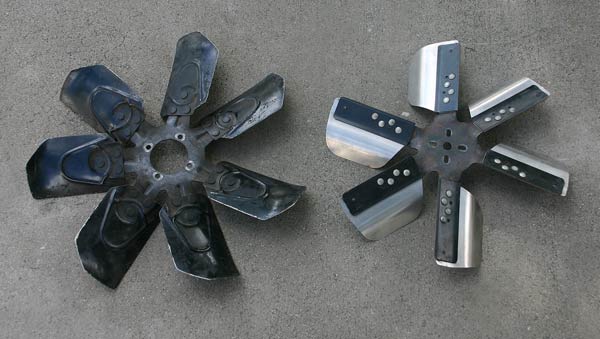
The new fan is made of heavy-duty steel with lightweight stainless blades to allow for flexing out at high engine speeds.
We decided to swap out our old stock-style fan with a new 18” heavy-duty flex fan from Flex-a-lite. These fans are designed with a greater blade pitch to move more air faster at low RPM speeds. Since the car is often used in daily driving situations such as city and freeway traffic, we figured it would be a good investment to the cooling system. In addition to the increased low-speed flow, the fan blades literally flatten out at higher RPMs- drastically reducing the overall drag on the motor. Eckler's Corvette carries a good selection of fans for all years of Corvette. Click here for more info.
Due to tight clearances between the front of the fan and the radiator, it may be necessary to first remove the radiator and its shroud before accessing the fan. Trying to pull a tightly nestled fan without removing the radiator can prove hazardous to your fingers and knuckles– those fins are sharp! At least wear some protective gloves.
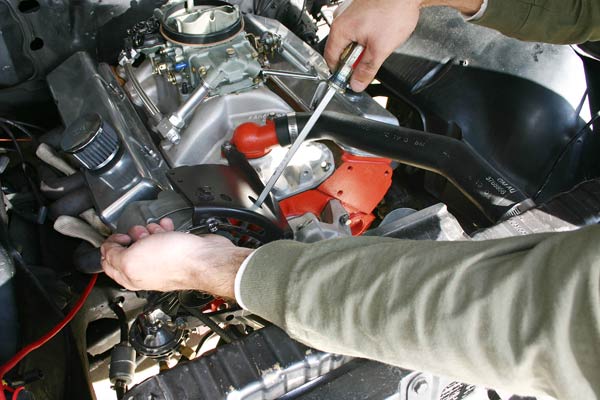
While prying the alternator up into position, tighten the bracket bolt with your other hand to set the load on the belt. In this particular case, we performed the task on a Chevelle. Obviously with the hood being hinged at the front on a Corvette, you'll have to work from the side of the car.
Let's Get Started
All engine fans are secured to the front flange of the water pump by long-shaft bolts that tie the fan clutch (if applicable), the fan, the pulley, and the water pump together. The first order of business is to loosen and remove the four bolts from the front of the fan. You can now access the fan belt directly. To release the tension from the belt, loosen the alternator’s slide bracket adjusting bolt. Removal is not necessary. Back the bolt out just enough to push the body of the alternator back towards the center of the motor. This will give the belt plenty of slack in order to be removed from the water pump and crankshaft pulleys.
With so many different manufacturers and endless part numbers, the best bet for proper belt replacement is to use what you know will work. In other words, don’t throw out your old one just yet. Take it with you to the parts store and have them match it up. That way there are no surprises and everything goes back together like it should.
Installing The New Fan Belt
Installing the new fan belt in your Corvette is relatively straightforward and painless. Slip the new rubber (right side up) over the pulleys and grab your biggest, meanest screwdriver. A thin pry bar will work as well. Leverage the bar under the alternator and force it to slide up and out (opposite of the way it was loosened). When the alternator is back into position, tighten the slide bracket adjusting bolt to hold it in place. Check for proper tension by depressing the belt midway between the two pulleys. The belt should deflect about ½ inch if the distance between the pulleys is 12”-16”, or ¼ inch if the distance is between 6”-10”.
Depending on the type of fan you select, the mounting procedure may vary slightly. In certain applications, aftermarket spacers are needed to position the fans closer to the core of the radiator. Regardless, the fan will ultimately mount back into the front flange of the water pump. Hardware should be included with most fan kits. Make sure you tighten everything down snugly. The motor produces intense and constant vibration and can cause bolts to loosen and back out if not sufficiently tightened. Double-check any tight clearances around the fan and the shroud before turning the engine over.
At this time, start the motor and check for any slippage in the belts. If they screech when you fire the ignition, they are too loose and need to be adjusted.
Shop for Corvette parts at www.EcklersCorvette.com
Follow us on our Corvette Facebook page. Click here and Like us!